Are you looking to propagate your guava tree but not sure where to start? Air layering is an easy and effective method for propagating trees, and it’s perfect for guava trees. It can be done in the comfort of your own backyard, and with just a few simple steps, you can have new guava trees growing in no time. In this post, we’ll guide you through the process of air layering your guava tree step by step. From selecting the right branch to preparing the rooting hormone and wrapping the branch with moss, we’ll cover everything you need to know to ensure a successful propagation. With this guide, you’ll be able to enjoy the fresh taste of guava from your own backyard for years to come.
Why Air Layering Is An Effective Propagation Method For Guava Trees
Air layering is an effective propagation method for Guava Trees because it allows the tree to produce roots while still attached to the parent plant. This means that the new plant will have a better chance of survival since it is already established before being separated from the parent plant. Additionally, air layering allows for the propagation of a specific cultivar, ensuring that the new plant will have the same characteristics as the parent plant. This is especially important for Guava Trees since they come in a variety of cultivars, each with its unique characteristics. Air layering is also a relatively simple propagation method that can be done without the need for specialized equipment or extensive knowledge of plant propagation. With a little bit of patience and care, anyone can successfully propagate their Guava Tree using air layering. Overall, this method provides a high success rate and is a great way to propagate your favourite Guava cultivar for yourself or to share with others.
Tips For Selecting The Right Branch To Air Layer
When it comes to air layering your guava tree, selecting the right branch is crucial for successful propagation. Here are some tips to help you make the right decision:
- Look for a branch that is healthy and vigorous, preferably one that is at least one year old. Avoid branches that are weak or diseased as they may not have the strength to develop roots or may spread the disease to the new plant.
- Choose a branch that is about the thickness of a pencil or larger. Thicker branches tend to have more cambium layer, which is part of the plant that will eventually develop roots.
- The branch should be at least 12 inches long and have several nodes or leaf joints along its length. Nodes are the points where the leaves attach to the stem and are important for root development.
- Look for a spot on the branch where you can make a clean cut and remove the outer bark and cambium layer down to the inner wood. This is where you will apply the rooting hormone and wrap it with the moss.
By selecting the right branch, you increase the chances of successful propagation through air layering. Take your time and choose carefully, as this step is crucial to the success of the process. - Preparing the materials needed for air layering
The Step-by-Step Process Of Air layering A Guava Tree
Air layering is a simple and effective method of propagating guava trees. It involves creating a wound on the stem of the tree and inducing it to produce roots at the wound site. The newly formed roots can then be separated from the parent tree and planted as a new, independent tree.
Here is a step-by-step process of air layering a guava tree:
- Choose a healthy, mature guava tree that has a stem diameter of at least 1 inch. Identify a spot on the stem that is 6-8 inches above the soil and free from any side branches.
- Using a sharp knife or pruning shears, make a 1-2 inch long cut around the circumference of the stem at the chosen spot. Make sure the cut is deep enough to reach the inner layers of the stem.
- Gently remove the bark and the outer layer of the stem at the cut site. Be careful not to damage the inner layers of the stem.
- Apply a rooting hormone to the exposed area of the stem. This will help to promote root growth.
- Place a handful of moist sphagnum moss around the exposed area of the stem. Make sure the moss is firmly in place and covers the exposed area completely.
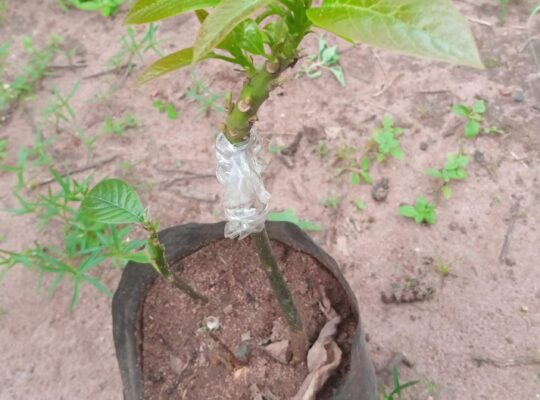
- Cover the moss with plastic wrap and secure it in place with a rubber band. This will help to keep the moss moist and create a humid environment for root growth.
- Wait for 4-6 weeks for the roots to form. You can check the progress of the root growth by gently removing the plastic wrap and checking the moss.
- Once the roots have formed, cut the newly formed stem from the parent tree just below the root ball. Plant the new tree in a pot or directly in the ground, making sure to keep the soil moist.
How To Care For The Air Layer After It Has Been Made
After you have made the air layer on your guava tree, it is important to pay close attention to its care to ensure that it has the best chance of success. The layer should be kept moist but not waterlogged. You can achieve this by wrapping the moss or other rooting medium in a plastic bag or saran wrap to trap moisture. However, ensure that you do not wrap it too tightly as this can damage the layer.
The air layer should also be placed in a warm and bright spot, but not in direct sunlight. Direct sunlight can dry out the layer and cause it to fail. You should also keep an eye out for any pests or diseases that may affect the layer. If you notice any signs of pests or diseases, treat them promptly.
You should check the layer every few weeks to see if roots have formed. This can be done by gently pulling on the layer. If it resists your pull, then roots have formed. After the roots have formed, you can remove the layer from the tree.
Transplant the air layer into a pot filled with well-draining soil. Water it thoroughly and place it in a bright spot, but not in direct sunlight. As the plant grows, you can gradually increase its exposure to sunlight. With proper care, your air layer should thrive and grow into a healthy and productive guava tree.
How To Detach And Transplant The Air Layer
Once your guava tree’s air layer has developed roots, it’s time to detach it so that it can be transplanted elsewhere.
First, you’ll want to cut off the top of the branch just above the air-layered section. This will encourage new growth and help the plant stay healthy.
Next, carefully cut off the air-layered section below the newly formed roots. Make sure to use a clean, sharp knife to minimize damage to the roots.
Once you’ve removed the air-layered section, it’s ready to be transplanted into a new pot or directly into the ground. Choose a location that has well-draining soil and plenty of sunlight. Dig a hole that’s slightly larger than the root ball and gently place the plant into the hole. Fill in the soil around the roots, making sure to pack it firmly but not too tightly.
Water the plant thoroughly and keep it well-watered for the first few weeks to help it establish itself in its new location. With proper care, your newly propagated guava tree should continue to grow and thrive for many years to come.
Common Problems That May Arise During Air Layering And How To Solve Them
Air layering is a great technique for propagating guava trees. However, like any other propagation method, it can come with some challenges. Here are some common problems that may arise during air layering and how to solve them:
- Lack of rooting hormone: Rooting hormone is crucial for the success of air layering. Without it, the roots may not form properly. Make sure you have enough rooting hormone and apply it generously to the cut area before wrapping it with moist sphagnum moss.
- Sphagnum moss drying out: The sphagnum moss should always be moist during the air layering process. If it dries out, the roots may not form properly. Check the moss regularly and spray it with water to keep it moist.
- Pests and diseases: Pests and diseases can damage the new roots and hinder their growth. Keep an eye on the air layer and treat any signs of pests or diseases promptly. You can use insecticides or fungicides to control the problem.
- Incorrect timing: Timing is important when it comes to air layering. Make sure you do it at the right time of the year when the tree is actively growing. If you do it too early or too late, the process may not be successful.
- Improper wrapping: The wrapping material should be tight enough to hold the sphagnum moss in place but not too tight that it cuts off circulation. Use a stretchy material like plastic wrap or aluminium foil and make sure it is wrapped securely.
By being aware of these potential problems and knowing how to solve them, you can increase your chances of a successful air layering process and propagate your guava tree with ease.
Frequently Asked Questions About Air Layering Guava Trees
Air layering guava trees is a great way to propagate your favourite variety of fruit trees. However, as with any new technique, there are bound to be some questions. Here are some of the most frequently asked questions about air layering guava trees:
- Can I air-layer my guava tree any time of the year?
While it is possible to air-layer your guava tree at any time of the year, it is best to do it during the growing season when the tree is actively producing new growth. This will give the new roots the best chance of forming quickly and successfully. - How long does it take for the roots to form?
The time it takes for the roots to form will depend on various factors, such as the health of the tree, the time of year, and the growing conditions. In general, it can take anywhere from a few weeks to a few months for the roots to form. - How do I know when it’s time to cut the air layer off?
Once the roots have formed and are well-established, you can gently tug on the stem to see if it is firmly rooted. If it is, you can go ahead and cut the air layer off. - What should I do with the new plant once it is cut off?
Once the air layer has been successfully rooted and cut off, you can plant it in a pot or directly in the ground. Be sure to keep the soil moist and provide it with plenty of light and nutrients to encourage healthy growth.
By following these steps and addressing these frequently asked questions, you can successfully air-layer your guava tree and propagate new plants for your garden or orchard.
Tips For Successful Propagation Of Guava Trees Through Air Layering
Air layering is a highly effective method for propagating guava trees. It involves creating a new plant by inducing roots to develop on a stem or branch while it is still attached to the parent plant.
To ensure successful propagation through air layering, here are some tips to keep in mind:
- Choose a healthy branch that is at least one year old to air layer.
- Make sure to sterilize your cutting tools before using them to prevent the spread of disease.
- The best time to air layer a guava tree is during the spring or early summer when the tree is actively growing.
- Choose a location on the branch that is free of any side shoots or leaves. This will ensure that the new roots have ample space to grow.
- Apply rooting hormone to the area where you will be making the cut to promote root growth.
- Wrap the area with moist sphagnum moss and then cover it with plastic wrap to keep it moist.
- Check the progress of your air layering periodically by gently removing the plastic wrap. If you see roots growing, then you know that it is successful.
- Once the roots are well-developed, remove the air layer from the parent plant and pot it in well-draining soil.